Thursday, September 27, 2012


Its Fall & time to talk about Rose Hips

Rose Hips are also known as rose haw or rose hep, but basically its the fruit of the rose bush, that appears where the flowers once were.

If you have never tried collecting rose hips, be aware the rose plant has thorns which you must guard against. It is recommended that when harvesting rose hips, you plan ahead, and wear long sleeves of a tougher type fabric so as to not be grabbed by the thorns. The worst thorns to be nipped by, in my opinion, are the tiny microscopic ones that torment you for hours since they are hard to see embedded in your fingers or forearms!

I tend to not only wear long sleeved work shirts, but also jeans & gloves when planning to harvest this delicious & nutritious berry. While the rose is a dwarf plant, the prairie has numerous thorny, prickly and thistle type seed heads that are looking for a free ride! So having a good pair of thick pants can help reduce the scratches you may obtain while foraging for this delicacy.

There are numerous types of roses, but my favorite rose to harvest is the wild prairie rose, [Rosa blanda or Rosa arkansana] which is also known by the common names

Arkansas rose

sunshine rose

dwarf prairie rose

prairie wild rose

and is found across the northern prairie. It is so prevalent in some areas, such as North Dakota, that the state made it their state flower.

The wild rose is distributed across a great deal of the North America, as this map illustrates and thus is an ideal source of vitamin C if someone is working to reduce their Carbon footprint

and wanted to reduce their dependence of citrus fruit from southern climates, which is then trucked to northern climates in winter.

Experts state that 3 hips of rose equals one orange, when considering its Vitamin C source.

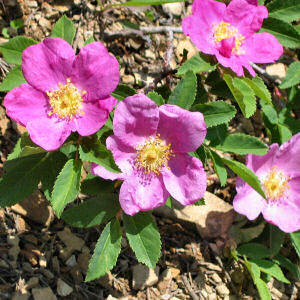
It is best to locate your wild rose sources in June & July, when they are in full bloom. The Prairie wild rose is a prickly-stemmed native shrub (usually less than 18 inches tall) with pink, five-petaled flowers.

The Prairie rose is not the only rose hip producing rose species. All roses produce hips. Some much larger and some smaller than the prairie rose. The experts say there are between 100 and 150 species of roses with most botanists agreeing that the actual number is probably nearer the lower end of that range.

Another wild rose found in some areas of South Dakota is the Woods' rose [Rosa woodsii]. Unlike the small prairie rose, the Woods' rose is a shrub that often forms large, dense thickets.

Finding both these sources helps me in collecting an ample supply of rose hips, for the various uses such as herbal tea, jam (2), (3), jelly,(2), (3), flour, syrup, soup, beverages, pies, bread, essential oils, and marmalade. Not to mention the flower crop needed to make essential oils & rose water.

If your main interest is obtaining Vitamin C rich hips, the wild hips will be the target for your foraging.

However, if you are like most people the sharp citric acid found in wild hips may be a bit intense. Many people choose to mix both wild hips with domestic rose hips, which have a fruiter taste to them.

Once you have collected your bucket of rose hips, its time to process the hips!

The processing method of hips depends on what you are planning on doing with them. Most methods of processing require that you remove the seeds from the meat of the fruit. This can be done in a couple different ways.

By hand ... by squishing the fresh berry and thus pinching the berry pod apart. Rose hips contain tannic acid in the seeds which cause a chalky taste. So you may want to split hips down one side and knock out seeds, or take pin and push out seeds before cooking for jelly or processing for other food purposes.

or

using a sieve to separate the seeds & pulp from the juice.

Here is a great series illustrating how to process rose hips traditionally. The beautify of this video is that he is not doing time-lapse video, so you SEE the full extend of the time consuming process. I believe in today's impatient world, perhaps its good to see this so there is no illusion as to the task at hand. I am therefore going to post all of the serious regarding the processing of rose hip syrup that this series posted.

There are numerous blogs too talking about Rose Hips' uses. I've tried linking several of them to this blog by hyperlinking words here and there. So please take the time to click on the highlighted words & see just how many recipes you can find for using this wonderful multi-vitamin of beauty. Rose Hip tea alone is toted as having the following health benefits:

Rosehip tea has antibacterial, anti-viral, antioxidant and anti-inflammatory properties.

Due to its anti-aging properties, the tea heals tissues and cells.

The tea fights cell damage caused by free radicals, tones the organs and regenerates cells.

The phyto-chemicals present in rosehip tea prevent cancer and cardiac problems. It is a tonic that can invigorate and refresh a person and also increase his energy level.

The nutrients present in the tea boost immunity and health.

The vitamins contained in rosehip tea ensure vitality and longevity.

Rosehip tea prevents colds and viral infections.

It cleanses the respiratory tract and clears mucous congestion; thus, easing breathing.

The tea is also helpful in minor ailments, like urinary tract infections.

It prevents stress and acts as an anti-depressant, due to its calming effect.

Rosehip tea is good for hormone regulation, skin hydration and circulation.

The tea is recommended by medicine practitioners for relieving nausea, headaches, menstrual cramps, kidney and bladder infections, diarrhea and dizziness.

The pectin present in rosehip tea helps in relieving constipation, cleansing the intestines and lowering cholesterol.

It is used for treating disorders like allergies, asthma, bronchitis, etc.

Rich in flavonoids, rosehip tea helps in strengthening the body’s capillaries.

It fights dysentery and strengthens the stomach.

So with such a powerful medicinal and food at our doorstep, why not take a fall evening processing rose hips with friends & family?

Friday, September 14, 2012

The Climate we live in: Dehydrating using the sun


Its the season of the harvest, and depending on your climate you may have an easier time than some to dry your herbs for storage.

I have used air drying for decades. Nothing fancy, just took the herbs and bundled them with a string & hung them up high along the wall in my kitchen (which had 9 foot ceilings), allowing the heat of the room to dry them. This worked for a long time in the various western states I lived in over the years. However, if you live in humid climates, as I do in eastern South Dakota; air drying is almost impossible! Simply bringing solar dried #vegetables into the house at night, when using a solar drying is not enough! The air even inside the house tends to be too humid!

I've tried using electric dehydrators, but I find they are too small for the production of vegetables and herbs I need to dry all at the same time. So while I'm waiting for the dehydrator to dry my vegetables, the rest are rotting in buckets and baskets!

Adding to this downside, is the fact that I'm using electricity. My preference is to reduce my electrical use, NOT increase it! So I began looking at other ways in which I might dehydrate here in South Dakota, where I currently live.

Another solution had to be found, that would allow me to dry a great variety of vegetables, flower seeds, herbs & medicinals in the short harvest period of fall.

I've tried the drying system of placing bundles of herbs tied together, hooked to a nail in the kitchen. It was ok, but it has its draw backs! While winter heat does dry the herbs, the problem lies in spiders LOVING the new "home" I've created for them to attach their webs too! Another problem is the fine dust that falls onto the herbs while drying, in the winter dry-air conditions of an enclosed winter home.

I've concluded that here, in Eastern South Dakota at least, I needed a drying method that was faster -- leaving out the dust collecting method of high-hung herbs that I just couldn't get myself to make tea with due to the fine dust-coating.

I know Native American women in the region, used to sun dry their winter food stuffs including corn without electricity! So its just a matter of figuring out how we might do it today!

My solution? My old mini-van!

Yes, you heard me right. I take advantage of that heat build up in our cars each day! My van happens to sit most of the time, in my driveway facing south. So its in the perfect position to collect a great deal of sunshine and heat.

So I decided to experiment.

My first clump of herbs I dried was some Mint.

It was a great success! Within less than 10 hours my mint was dry (though I kept it on the screen, in the van for another 14 hours just to be sure all moisture was gone.)

I then decided to try drying some Cilantro, Mushrooms & Tomatoes.

Fresh Cilantro

Cilantro, 8 hours later

Even the thick end caps of the Tomatoes, given a couple extra days of drying, dried nicely. Its important, once you dehydrate anything, to remember to place it in an airtight container so as to keep moisture from entering back into the product. I am using recycled glass jars with sealing lids. The jars were boiled in water, as were the lids to sterilize the jars, then dried, before they were used.

They too have been drying very efficiently. Of course the thicker vegetables and fungi require more hours of dehydration. I have been drying the Mushrooms for three days so far.

By day three, they went from looking like the first photo to the following photo provided:

I also dehydrated Rosemary. I took the rosemary, still on their stems & placed them on the drying rack. As a thicker woody herb, it took several days to dry them completely. But I believe it is well worth drying them! They smell wonderful!

Once the herb was completely dry, I collected the stems carefully from the drying screens & took them into the house, where I removed the rosemary's needles into a small glass jar.

My latest test for my off-grid dehydration system is to see if I can dehydrate some Sweet corn, used in Indian Corn soup; as well as some seed heads from a neighbor's flower garden. Note: Day four of the corn drying. Dimples are beginning to appear in most of the kernels... indicating the dehydration is happening.

I have also begun drying Marigold seed heads and Elder seedsfollowing me processing some Elder Berries.

The heat in the van doesn't get over 120 degrees, so I should be able to not only dry herbs and vegetables for cooking. I suspect I will be able to dry seed stock for future garden use. So I've placed some brown paper bags in the van, with collections of Hollyhock, bachelor buttons and other seed heads (each in its own brown bag) so as to test whether this would be a suitable method for me to dry my seeds for storage.

I do not however recommend this technique to anyone living in a more southern climate. Not even in southern Kansas! It is critical that you determine the heat produced in your closed up vehicle, before placing seed stock into the vehicle for dehyrating.

As you can see in the photo. I place a window screen frame (look for ones with Plastic screening) across from the dash to the back of the seat. This allows air flow through the screen.

I have placed screens from the front seat head rest, to the middle seat as well, and the middle row bench seat to the back seat; giving me the full length of the interior of the van to dry vegetables and seeds.

Celery : I took two photos of the celery. One is the celery 8 hrs into dehydrating;

& one at the end of the process, two days later.

Some of the vegetables I hope to test include:

Eggplant : Began drying Sept 16th, 2012

Zucchini: Began drying Sept 16th, 2012

Chives

Carrots

Onions

Summer Squash

Potatoes

Broccoli

Beets

Apples

Bananas

Strawberries

Rosehips

Sage

Dandelion Roots

Arrow Roots

Gooseberries

Willow Bark

Grapes

Brussel Sprouts

sunflower heads (and more if weather conditions hold!) So I will keep you informed. I will try to update this blog as each new vegetable is tested.